日本語:ガンプラのゲート処理のやり方|二度切り・ヤスリと白化を抑えるコツ
Disclosure: This article contains affiliate advertisements. As an Amazon Associate, this site earns from qualifying purchases. The cover is an AI-assisted illustration created for this site.
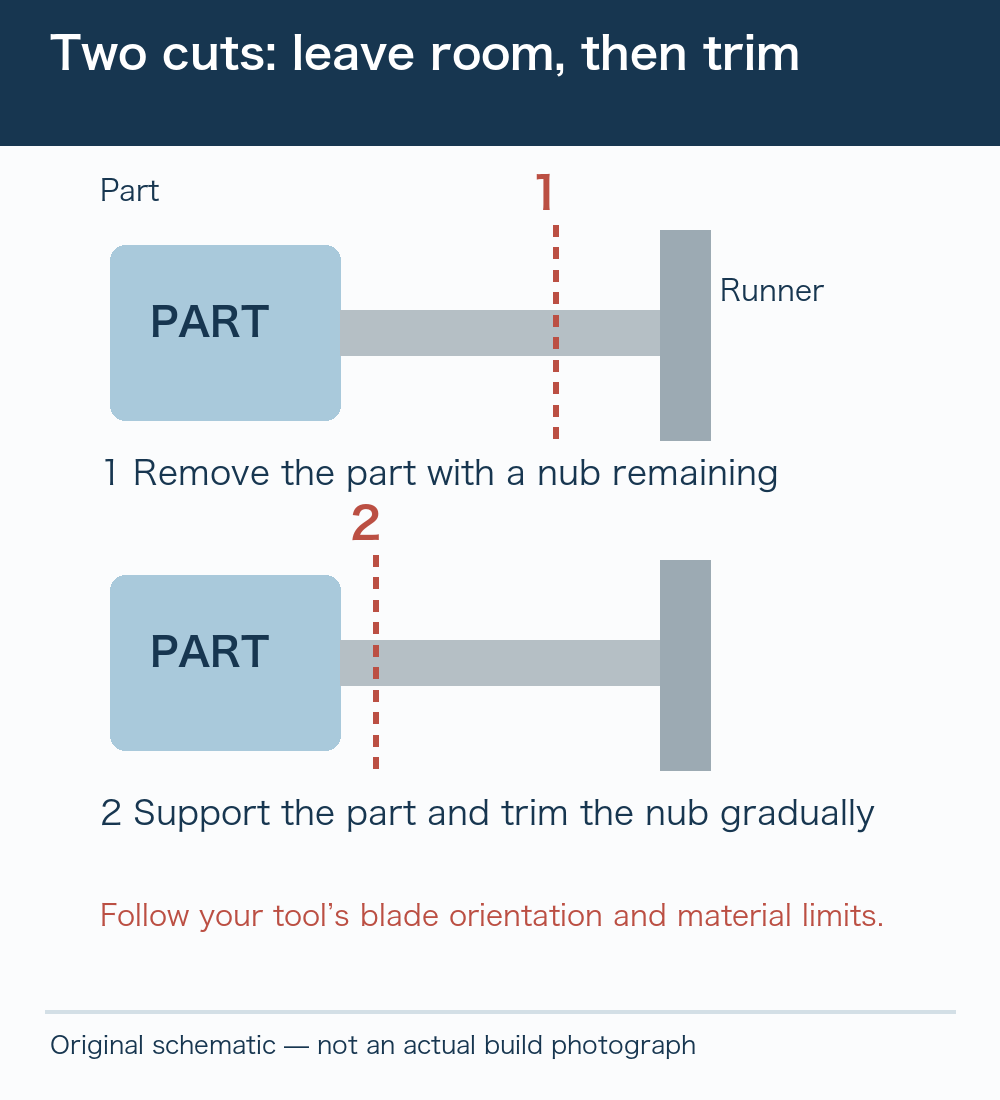
Nub removal means gradually reducing the plastic left at a gate. The useful idea behind two-stage cutting is to separate the part from its runner with some material remaining, then trim that remainder more carefully. Blade orientation and cutting capacity depend on the tool: check its instructions and the kit’s material first.
This is a guide to an unpainted finish. The diagram explains positions; it is not a tested before-and-after photograph of one particular part.
A nub, stress whitening and a sanding scratch are different
| What you see | What to check |
|---|---|
| Raised plastic | A remaining nub can be reduced gradually |
| A white mark | Brush off dust first. Internal stress whitening may remain after surface sanding |
| Lines or a different sheen | You may be seeing abrasion or a finish change, rather than more material to remove |
Do not assume that every pale patch is the same kind of defect at the same depth. Inspect the surface after removing dust. A coloured part can retain a colour difference at the gate even when the surface feels level.
1. Leave material on the first cut
Support the part and separate it without driving the cutting edge straight into its finished surface. The drawing is not to scale and does not prescribe a universal cutting distance. Adjust to the part, the gate and the tool’s instructions. This is not a method for cutting metal wire or a runner beyond the cutter’s rated capacity.
2. Trim the remainder with control
Reposition the detached part and inspect the nub. Use the blade as its manufacturer directs, avoiding cuts that dig below the intended surface. Do not apply a single-blade technique uncritically to a cutter with a different construction.
If a gate is recessed or difficult to reach, do not twist the blade into the gap. Reconsider the available angle and the surrounding shape. A small remainder may be more manageable with a suitable abrasive than with a forced final cut.
3. Sand a little, stop and inspect
Identify the raised area rather than rubbing the entire part immediately. Use an abrasive suited to the shape, make a few light passes, remove dust and examine the result. Frequent checks help you notice when you are changing the surrounding surface rather than just removing a nub.
Lower grit numbers generally indicate a coarser abrasive. A fine abrasive is not an efficient substitute for reducing a large nub appropriately, but there is no rule that every part must start with the coarsest available grit. Choose a starting point that suits the remaining material and the surface you want to retain.
GodHand Kamiyasu 5 mm Set B
GH-KS5-A3B contains two #600 pieces, two #800 pieces and one #1000 piece. Its 5 mm sponge backing differs from a thin sheet abrasive. Check the thickness and the B-set designation: the A set and other thicknesses are different products. We are not presenting this finishing assortment as a universal solution for every large nub.
Stop before chasing a white mark too far
If whitening remains after the surface is level, more sanding does not guarantee a complete repair. Preserving the shape may be more valuable than removing every trace. You can accept a small mark, choose a less revealing pose or consider painting as a separate project.
A sanded area may also reflect light differently from untouched moulded plastic. Inspect the model from a normal viewing distance rather than judging the entire build by one close-up gate location.
Frequently asked questions
Is an expensive single-blade nipper essential?
No. Understanding the tool you have and separating removal from finishing is more important. A single-blade product still has its own material limits and handling instructions.
Should I use this removal method on a tool-free EG?
Follow the EG kit’s prescribed removal method first. Tool-free removal and a nipper-based sequence are different starting points. Continue to our assembly guide for the overall build, or the tool guide for buying decisions.
More guides for building and displaying Gunpla
- Best First Gunpla: How to Choose Between EG and HG
- How to Build Gunpla: Instructions, Parts and Your First Straight Build
- How to Pose Gunpla: Natural Stances and Supported Action Poses
- Gunpla Display Cases: Measure the Kit, Weapons and Base First
- No Room for Gunpla? Small-Space Displays and Rotation Storage







Comments